
When it comes to achieving flawless makeup, there’s one tool that many beauty lovers rely on —the beauty blender. Whether you’re applying foundation, concealer, or even blush, these versatile sponges are a must-have in any makeup kit. But with so many different types of beauty blenders available, how do you choose the right one? In this blog, we’ll explore the different types of beauty blenders, how to use them, and tips for keeping them in top shape.
What is a Beauty Blender?
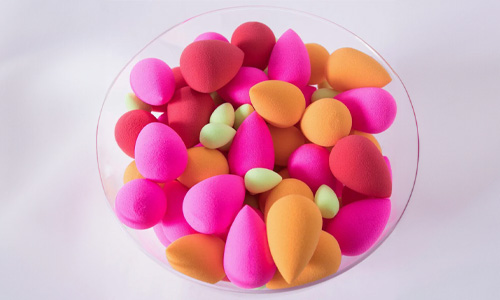
A beauty blender is a soft, egg-shaped sponge used to apply makeup products like foundation, concealer, powder, and more. Unlike brushes that can leave streaks, beauty blenders help create a smooth, even, and natural-looking finish. They are also super versatile and can be used with liquid, cream, and powder products.
Beauty blenders are your go-to tool for creating that flawless, airbrushed makeup look with minimal effort.
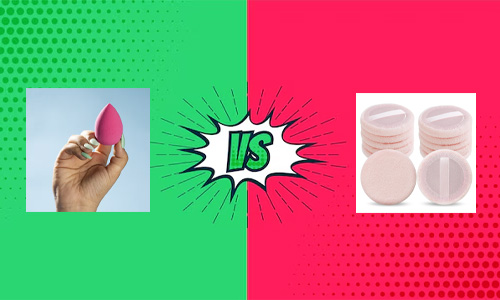
Different Types of Blenders and Their Uses
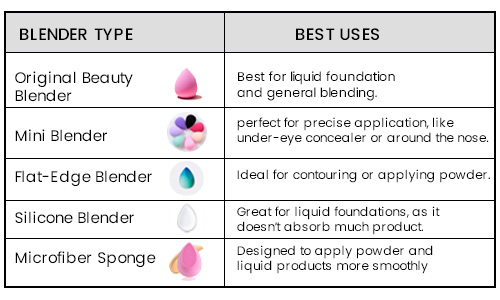
Not all beauty blenders are created equal. From different shapes to textures, there’s a type for every need.
Each beauty blender has its own unique purpose, so it’s all about finding the one that suits your makeup style.
How to Choose the Best Blender?
With so many options available, how do you know which beauty blender is right for you? It all depends on your makeup routine and personal preferences.
The Key Tips
- If you use mostly liquid products, go for the original sponge or silicone blender.
- For powder products, try the microfiber sponge.
- Need precision? The mini blender is your best friend.
Choosing the right beauty blender involves understanding your needs and the types of products you use the most.
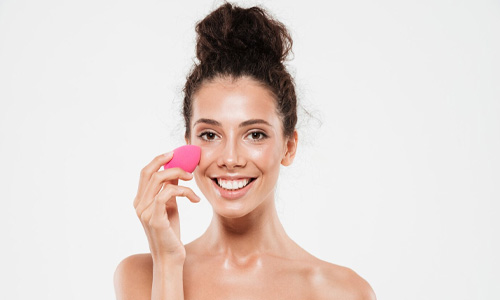
Why Use Blenders?
Why should you choose a beauty blender over a brush or your fingers? Blenders give you a smoother, more even finish without absorbing too much product.
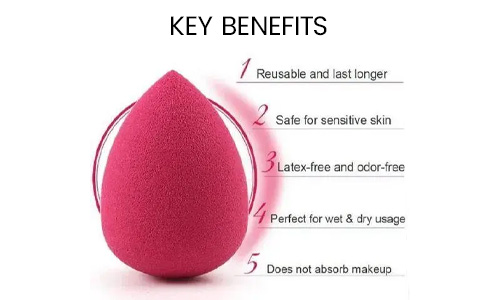
The Key Benefits
- Even Application
Beauty blenders help spread makeup evenly, giving you a natural, streak-free finish.
- Less Product Waste
Especially with options like silicone blenders, you use less product since it doesn’t get absorbed into the sponge.
- Versatile Tool
From liquid foundation to concealer and cream blush, one beauty blender can handle it all.
- Precision Control
The shape and flexibility of beauty blenders make it easy to reach tricky areas like around your nose and eyes.
Beauty blenders are more than just a makeup tool, they’re an all-in-one solution that simplifies your routine while giving you professional-level results. Say goodbye to uneven makeup and wasted product, and say hello to that perfect, smooth finish.
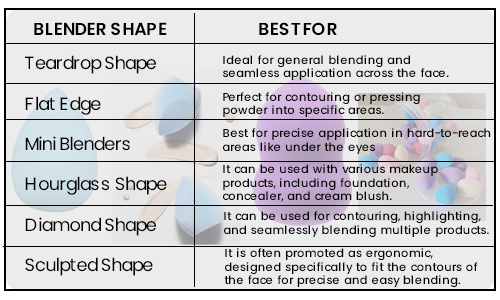
Does the Shape Matter?
The shape of your beauty blender isn’t just for looks, it plays a key role in how and where you apply your makeup. Each shape is designed to tackle different areas of the face and different makeup techniques. So yes, the shape does matter.
Common Beauty Blender Shapes and Their Uses
What is the Flat Side of a Beauty Blender Used For?
If you’ve ever wondered why some beauty blenders have a flat side? That flat edge is more than just a design feature.
The flat side of a beauty blender is one of its most versatile features. It’s specifically designed to give you more control and precision when applying makeup, especially when you need to press or blend products into specific areas.
Here’s how you can make the most of the flat side,
1. Applying Powder
The flat surface is perfect for pressing setting powder into your skin, particularly in areas that tend to get oily or need a smooth, matte finish. This is especially helpful for techniques like baking under the eyes or along the jawline.
2. Contouring
When it comes to contouring, the flat edge allows you to apply the product in straight, clean lines. This is ideal for areas like your cheekbones or the sides of your nose, where precision is key.
3. Blending Larger Areas
For areas like your forehead and cheeks, the flat side gives you a broader surface for quicker, more even blending. This helps you apply foundation or cream products faster while ensuring a flawless finish.
4. Setting Under-Eye Concealer
The flat edge is perfect for pressing concealer or powder under your eyes. Its shape allows you to get right up under the lower lash line, ensuring that the product is applied smoothly without creasing.
5. Pressing and Blending Cream Blush
The flat side works well for blending out cream blush, allowing you to pat the product onto your skin and blend it out smoothly for a more natural look.
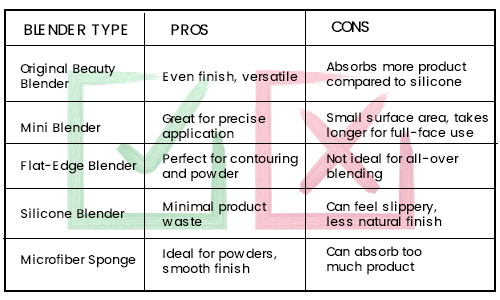
Pros and Cons of Each Blender Type
How to Clean and Maintain Your Beauty Blender?
Keeping your beauty blender clean isn’t just about making it last longer, it’s also about preventing bacteria buildup.
1. Daily Cleaning After Each Use
- Wet the Sponge
- Apply a Gentle Cleanse
- Lather and Squeeze
- Rinse Thoroughly
- Squeeze and Dry
2. Weekly Deep Cleaning
- Soak in Warm, Soapy Water
- Massage the Blender
- Rinse and Repeat
- Dry in a Well-Ventilated Area
3. How to Remove Stubborn Stains
-
Microwave Method
Soak your beauty blender in a microwave-safe cup filled with soapy water. Microwave the cup for 30 seconds. This process helps loosen stubborn stains and kills bacteria. Be sure to let it cool before handling.
-
Use a Cleansing Solid
Cleansing balms or solids, specifically made for makeup sponges, are excellent for removing deep stains. Rub the blender directly onto the solid soap, then rinse thoroughly.
4. Tips for Maintaining Your Beauty Blender
-
Dry it Properly
Always let your beauty blender air dry after washing. Ideally, leave it in an open space on a clean towel or drying rack to prevent mold and bacteria from developing.
-
Replace Every 3-4 Months
Even with proper care, beauty blenders don’t last forever. Replace your beauty blender every 3 to 4 months, or sooner if it shows signs of wear and tear (like crumbling or thinning).
-
Avoid Harsh Soaps
Strong soaps can break down the delicate material of your beauty blender, causing it to lose its softness. Stick to mild, gentle cleansers.
-
Don’t Put It in the Dryer
Air drying is the best way to maintain your beauty blender’s shape and texture. The heat from a dryer can cause the sponge to warp and degrade over time.
5. Mistakes to Avoid
-
Using Hot Water
Hot water can cause the sponge to break down faster. Stick to lukewarm water for cleaning.
-
Not Cleaning Often Enough
Skipping regular cleaning can lead to product buildup, which makes the blender less effective and may irritate your skin.
-
Not Letting it Dry Properly
Storing your blender while it's still wet is a recipe for bacterial growth. Always make sure it’s completely dry before storing it.
6. Storage Tips
-
Keep it Ventilated
When not in use, store your beauty blender in a well-ventilated holder or a beauty blender case with holes for airflow. This prevents dampness and bacteria from accumulating.
-
Avoid Confined Spaces
Never store a damp beauty blender in a makeup bag or drawer. Always allow it to air dry fully before putting it away.
Cleaning your beauty blender regularly will not only help it last longer but also keep your skin healthy.
Beauty Blender vs. Other Makeup Tools
1. Beauty Blender vs. Brushes
- Beauty Blender
Provides a smooth, streak-free finish; blends liquid and cream products easily.
- Brushes
Offers more control but can leave streaks and require more effort to blend evenly.
2. Beauty Blender vs. Fingers
- Beauty Blender
Absorbs excess product, giving an even, flawless look without transferring oils.
Fingers
- Convenient and warms up the product for easier blending, but can transfer oils and bacteria to the face.
3. Beauty Blender vs. Other Sponges
- Beauty Blender
Soft, flexible, and designed for multi-use with liquids, creams, and powders.
- Other Sponges
May be stiffer, less effective at blending, and sometimes disposable after a few uses.
FAQ
1. How often should I replace my beauty blender?
You should replace your beauty blender every 3 to 4 months, or sooner if it starts to tear.
2. Why does my beauty blender smell bad, and how do I get rid of the odor?
A bad smell is usually due to bacteria buildup, deep clean it with a gentle soap and let it dry completely in a well-ventilated area.
3. Should I use my beauty blender wet or dry?
Use it damp for liquid products and dry for powder products.
4. How do I prevent my beauty blender from tearing?
Be gentle when squeezing out water and avoid using harsh soaps or twisting the sponge.
5. Can I use a beauty blender for applying skincare products?
Yes, a beauty blender can be used to apply serums, moisturizers, and primers for an even layer.
6. Is it safe to microwave a beauty blender for cleaning?
Yes, but ensure it’s soaked in soapy water first, and don’t microwave it dry to avoid damage.
7. How do I know if my beauty blender is too old to use?
If your blender is tearing, thinning, or not bouncing back after washing, it’s time to replace it.
8. Can I use a beauty blender with setting spray?
Yes, you can dampen the beauty blender with setting spray to help set makeup or refresh the skin.
9. What’s the best way to travel with a beauty blender?
Store your beauty blender in a breathable container or case to prevent bacteria buildup during travel.
10. How do I fix a beauty blender that’s too dry?
Simply soak it in water until fully saturated, then squeeze out the excess for ideal dampness.


